Rhythmic building bricks are often used in the Orff process and let students take simple rhythms and then create more complex ideas. Let’s look at the basics of how to use them for teachers new to the process and some special extensions for those who’ve used them before.
The Origin of Rhythmic Building Brick
Rhythmic building bricks were designed by Carl Orff’s contemporary, Gunild Keetman, and explained in detail in her wonderful book, “Elementaria.” They are simple note patterns that can be combined into more complex patterns.
As an Amazon Affiliate, I make a small commission at no additional cost to you.
What Are Rhythmic Building Bricks?
Rhythmic building bricks, sometimes called rhythm blocks, are 2-beat patterns using only quarter notes, quarter rests, and paired eighth notes.
Students brainstorm and find words that have the same number of syllables as the simple patterns so 1, 2, 3, or 4 sounds.
Then they string 4 or 8 bricks together to create a more complex pattern.
Teachers often use themes to support cohesiveness to the complex patterns that are created.
Older students can explore bricks in compound meter using 1 (dotted quarter), 2 (quarter eighth), and 3-note (3 eighth notes) combos. Valentine’s Day and February is the perfect time to try this variation.
How Are Rhythmic Building Bricks Used
Halloween/October is the perfect time to use rhythm bricks. Here’s what one class created.
The top of the board shows their brainstorming. The bottom shows the bricks they put together to create a more complex pattern.
In the above 8-brick pattern, students used repetition to create their “beat.”
Haunted House (3), Halloween (3), Jack-o-lantern (4), Boo (1). Black Friday (3), Frankenstein (3), candy (2), Boo (1).
Specific Learning Goals
Repetition: It’s a perfect time to teach them about repetition and that it might not sound the best to use “one of each pattern.”
Exploration: When working with a partner or in groups, learning to try different combinations is optimal. The idea of “one and done” is a big NO.
Form: What you create from the new patterns makes a perfect “B” section for a song or poem.
The Halloween beat above would be the perfect B section to an A of Pass the Pumpkin for a final ABA form.
If working in multiple groups, it becomes a great way to teach rondo form. ABACADA where “A” is Pass the Pumpkin and B, C, and D are the 8 measure beats created by different groups.
Tone Color: Taking the patterns and transferring to instruments is a great way to let students learn about tone color. What instrument(s) will sound best with your pattern and the overall theme?
Extensions
Centers
Using whole-class instructions is a great way to learn about and work with bricks. You can extend and expand the learning in other ways.
Individual/Partner/Small Groups: Students can explore in these groupings in a regular class setup or in centers.
Your music center setup will be a BREEZE with this easy-to-use and effective “Create a Songtale” rhythm resource using quarter notes and rests and eighth note pairs in a rhythmic building brick format.
Making Bricks
Make blocks for centers using building blocks or foam cubes. On the building blocks, use stickers or a permanent marker. I sprayed a coat of polyurethane on my blocks and it really helped keep the notes from rubbing off.
As an Amazon Affiliate, I make a small commission at no additional cost to you.
I got the Mega Bloks below from my local Goodwill. Prextex Blocks are currently the closest I can find to them.
Written Activities
A fun writing rhythm activity using building bricks where students create a rhythm menu and take-out orders!
Join the hundreds of other teachers who get the Oodles Newsletter delivered to their inboxes every Monday morning, filled with the latest from content creator videos to timely resources.
Processing…
Success! Use the PW: MUSIC4LIFE to unlock FREEBIES on the Subscriber Spot tab in the top menu!
Whoops! There was an error and we couldn't process your subscription. Please reload the page and try again.
Classroom lighting doesn’t have to be like a scene in a horror movie: “The fluorescent lights flickered, casting pale light against the beige concrete walls while the yellowed shades all hung awkwardly at different lengths against the windows that wouldn’t open.”
YES! You know we’ve all been in that room in a school!
If you’re looking for classroom lighting ideas to create a peaceful MOOD and groovy VIBE, keep reading!
IMPORTANT: Rules change from district to district, so it is imperative that you check with your administration about fire safety and the use of “extra” lighting. All of the images from my classroom show lighting that was approved by my district.
Table of Contents
Classroom Lighting Benefits
Numerous studies have demonstrated a clear connection between lighting quality and student performance. Well-designed lighting in educational settings can enhance student focus, comprehension, and overall achievement.
Proper lighting not only reduces visual discomfort but also creates an environment conducive to active participation and cognitive engagement.
And sometimes, lighting can be SO FUN!
It can set a mood from calm to celebratory that takes a lesson to the next level.
Let’s look at how we can do damage control to the bad and ramp up the good!
Fluorescent Light Covers for Damage Control
Fluorescent lighting is a common feature in many classrooms, but it often comes with drawbacks that can hinder student focus and comfort. Light covers provide a creative and effective solution to transform the harsh glare and flicker of standard fluorescent lights into a more inviting and visually appealing environment.
Let’s explore safety features, designs, and placement of these fluorescent light covers.
Safety & Permission
Not all schools allow these covers so you need to make sure you get permission from your administration and/or custodian. Also called light diffusers or panels, these covers are specially designed overlays that fit over standard fluorescent light fixtures.
They attach to the light frame with strong magnets sewn into the edges. These covers are usually made from various flame-retardent materials and come in a range of patterns and designs.
I had the basic blue covers and placed them over the center back light and all across the middle. You can also see a desk lamp (on a broken conga drum) in the back corner and the natural light coming from the windows.
Designs and Placement
The covers come in such fun designs and colors. I was going for calm and cool so I got the blue for my classroom and put them on banks of lights toward the back/middle of the room. I had the ability to turn on/off all of my ceiling lights in several configurations. Some classrooms don’t and it’s either all on or all off for them.
TIP: If you have just all on/all off light switches, ask your principal if the district can send an electrician and give you more options for your ceiling lights. You never know if you don’t ask!
I almost always turned off the bank of lights at the front of the room (where my screen was located) and depending on the class, time, and activity had one or two banks on. I had floor and table lamps so sometimes I had no ceiling lights on at all.
As an Amazon Affiliate, I make a small commission at no additional cost to you.
Floor and Table Lamps
Effective learning is fostered in an environment where students feel comfortable and engaged. Floor and table lamps play a pivotal role in setting the mood by creating a warm and inviting atmosphere.
This was my favorite way of changing the atmosphere in my room! I had 5 or more table lamps and one floor lamp spread all throughout my room. In all my years of teaching, I rarely had good natural light. My classrooms were often in basements or facing north.
Lamp on broken conga drum “stand” for ambient lighting in a dark corner of the music room.
Table lamps to the left and right of the door provide warm light while ceiling lights are not on at all.
What are the benefits of ambient lighting in the classroom?
Use more subdued lighting when
classes are coming from PE, recess, lunch, and other active times.
you’ve had high energy parts to your lesson and are ready for students to listen and focus.
you’ve had a classroom event or conflict and need to restore calm to the class.
you are setting the mood for something new or mysterious.
The gentle glow they emit can transform an ordinary classroom into a space that encourages collaboration, creativity, and focused learning. The soft, diffused lighting from these lamps can help reduce eye strain and contribute to a sense of well-being among students. It just feels like home with lots of ambient lighting.
I found my lights at Target during their back-to-college sales or at Goodwill.
SAFETY TIP: If you have a cloth shade, many times you will be required to spray it with a flame-retardent material and in some districts are not allowed to have cloth shades at all!
Shelf Floor Lamp
I did not have this shelf lamp in my room but saw it requested in a DonorsChoose project and fell in love with it! A soft glow lamp and SHELVES! If I’d known about these, I’d have had one (or two) in my room!
As an Amazon Affiliate, I make a small commission at no additional cost to you.
Using String Lights in the Classroom
String lights, known for their enchanting glow and versatile design, have found their way beyond holiday decorations and into educational spaces. These whimsical lighting solutions offer a creative and engaging way to enhance the classroom environment, fostering a sense of comfort, creativity, and inspiration.
Create focus for the bulletin board with the neon lights and a fun presentation mood with white lights around the presentation screen.
Supernight LED RGB strips change colors and have a remote control.
Infusing Magic into Learning Spaces
String lights have a unique ability to infuse spaces with a touch of magic and wonder. By draping them along walls, bulletin boards, or bookshelves, you can instantly create a captivating atmosphere that captures students’ attention and imagination.
Perfect for creating zones of focus and learning, the soft, twinkling lights create a cozy ambiance that encourages relaxation and exploration, making the learning environment feel less formal and more inviting.
Safety and Practicality
I had white string lights around a back bulletin board and rarely turned them on. Speaking honestly here, I was afraid that I’d forget to turn them off. I never had the same fear with my lamps for some reason.
Once again, you would need to know your school rules for using this type of lighting.
Black Lights for that Fun Vibe
A very popular choice these days is to pair black lights with songs and activities for a fun effect at concerts. These UV lights also are being used more and more in the classroom to set a mood and to use directly in lessons.
Black Lights for Concerts
There’s an entire blog post dedicated to black lights in concerts with buying ideas and specific songs and activities to use. Check it out!
Inspiring Creative Projects in the Classroom
One of the standout features of black lights is their ability to reveal hidden patterns and colors. In the classroom, this characteristic can be harnessed for creative projects that captivate students’ interest. Students love “Glow Days.”
Have students use fluorescent markers or glow sticks to write rhythms then turn the lights out to reveal the neon creations!
Use fluorescent paint and a stencil to spray paint your school mascot on bucket drums and have a bucket drumming Glow Day!
Use glow tape on rhythm sticks for a Glow Stick Play Along day.
Have these anytime of year but for sure during Halloween week. (Think Addams Family theme)
Use white cups for cup routines or white gloves for body percussion routines.
Write clues around the room using a fluorescent dry erase marker for a Scavenger Hunt. Turn the lights off and let the game begin.
While black lights can be both educational and entertaining, safety considerations are paramount. Direct exposure to UV radiation should be minimized, and proper precautions should be taken to prevent eye strain. Educators should also ensure that any materials used for projects are safe and non-toxic.
Conclusion
I found so many positive student outcomes from having a lighting plan for my classroom. And the win-win is that I benefitted too.
Join the thousands of other teachers who get timely tips, FREEBIES, and trending videos and music delivered to their inbox EVERY week! The Oodles of Music Newsletter!
Processing…
Success! Use the PW: MUSIC4LIFE to unlock FREEBIES on the Subscriber Spot tab in the top menu!
Whoops! There was an error and we couldn't process your subscription. Please reload the page and try again.
Are you in a panic when your school’s electricity goes out, the projector bulb goes pop, you need emergency sub plans, or your computer is on the fritz? Make this no-tech, low-cost Jeopardy board and you’ll be ready for any emergency! Say goodbye to technology and hello to an innovative, interactive, and budget and sub-friendly game that will make learning music (or ANY subject) an absolute blast!
What is a No-Tech Jeopardy Game?
A no-tech Jeopardy game provides an opportunity to combine music education with a thrilling game show format any time and in any situation. A music teacher or sub with no musical background, can walk in and without hitting a power button of any kind, have great learning K-5.
Modeled after the popular TV show, this interactive game allows students to answer questions, earn points, and engage in friendly competition. By transforming your music lessons into an exciting game, you can foster a love for music, encourage teamwork, and enhance student learning in a playful and memorable way.
Did I mention that it folds down to an easy-to-store rectangle?
Originally published April 4, 2021 Last Update April 9, 2026
Looking for simple and fun ways for your music classes to be active and engaged outdoors? Check out these easy outdoor music and movement activities for kids! Why outdoors? To enjoy the weather, quiet time during testing, or just a change of scenery for a brain break.
Table of Contents
This post may contain affiliate links. I make a small commission at no additional cost to you. Read my full disclosure.
Net Games
Use multiple setups for whole class play or just one for a station in learning centers. (see images & video below)
The GOAT (A Reverse HORSE Steady Beat Challenge)
The GOAT is a cooperative elementary music passing game where students work together to keep a steady beat while singing. Inspired by the basketball game HORSE, this version flips the idea: instead of earning letters for mistakes, students earn letters when they succeed.
🏆 The goal is simple: earn the letters G-O-A-T by singing and passing the ball correctly.
📋 This game encourages students to focus on the beat, teamwork, and accurate singing while staying fully engaged.
🔹 How to Play the GOAT Game
Students are in 2-person teams on opposite sides of a net. (4 total)
Both teams sings a familiar song or chant a rhyme while passing a ball on the *main beats.
Each pass or bounce should match the beat of the song.
🐐 If the teams sing the entire song without mistakes, they earn a letter. G.O.A.T. 🐐 When the teams spell GOAT, they win the challenge!
🔹 You have to start the song over if:
the hand touch on the ball isn’t on the *main beat (if the hand touch is on beat 1, the bounce is probably going to be on beat 2)
everyone isn’t singing
the ball doesn’t go over the net
*Passing to a STEADY beat isn’t the goal. Passing on the MAIN beat is the goal so their singing tempo may adjust to make it work.
🔹 What songs should I use to play GOAT? Choose songs already in your elementary music curriculum that have a strong, predictable beat. Folk songs and rhythmic chants work especially well because they are repetitive and easy for students to remember. Examples are Big Fat Biscuit, Dusty Bluebells, Pease Porridge, and I Never Saw a Purple Cow.
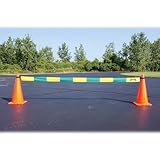
How to Set Up the Net
You can use 2 chairs and a piece of yarn for the cheapest and easiest setup!
Ask your PE teacher if they have these special nets or purchase for yourself.
I created GOAT after watching this PE class game in the video!
Students will compose short melodic phrases using commonly found household items, such as a rock to create “Melodies that Rock.” Younger students can explore music contour in relationship to high and low notes, while older students can write melodic patterns related to their grade level concepts.
Check out the full lesson plan at the VDOE Link below. Lesson plan was altered and adapted for outdoor sidewalk chalk activity.
Disclaimer: The Virginia Department of Education (VDOE) has not evaluated this resource for content nor accessibility. This material is provided “as-is” without warranties of any kind. Use professional expertise in evaluating and using this resource.
I learned about this game from our PE teacher and kids LOVE it. I tried to reconfigure it for music and came up with Pat, Clap, Snap. The objectives-
brain break
using body percussion
team building
Directions:
Two teams in rows. (red and blue above) The object of the game is to get your player from one end of the hula hoops to the other before the other team. Players must jump (2-footed) from one hoop to the next.
One person from each team begins. Those out go to the end of the line & the next person on your team begins at the beginning.
The red team begins at the green hoop. The blue team begins at the yellow hoop. The configuration of the hoops can be in any design as long as there are starting (ending) points for both teams. (In the gym or outside you have lots of room to curve the course all over the place.)
If your music room isn’t very big or you can’t use the gym or go outside, I think sit spots or bean bags would work. Instead of jumping IN the hoop, you’d jump over each spot/bag.
At some point the two players will meet (be facing each other) and that is when they’ll play Pat Clap Snap.
Instead of Rock, Paper, Scissors’ fist-fist-rock/paper/scissors, they will clap two times and then the third beat will need to either be a pat, clap, or snap. If they do the same motion, it’s a tie and they do it again until there’s a winner. The image above is a visual to help them remember what beats the other.
The winner keeps jumping, the loser goes to the end of their line and a new player for that team begins jumping, hoping to stop the other player. Here is the Rock, Paper, Scissors version.
Earth, Wind, and FIRE
Take any upbeat song such as Earth, Wind, and Fire’s “Let’s Groove Tonight” and create easy movement.
How to Move
Intro (stand and bounce to the beat)
Verse (lots of words so keep it simple-WALK to the beat)
Chorus (easier lyrics so stop and do simple choreography)
arms up, arms out, arms down, arms out (repeat)
Bridge (freestyle)
Walking and freestyle are a snap! Just something simple for the chorus and BAM, you’ve got it.
Whether you call them elementary music centers, stations, or small group activities, kids just call them FUN! Setting them up can be tricky, so here are my best tips for making music centers successful in your classroom.
This post may contain affiliate links. I make a small commission at no additional cost to you. Read my full disclosure.
Why Learning Centers?
Music learning centers were always a HUGE hit with my students! I think there are a couple of reasons.
They loved the variety of the day but also the variety in the music curriculum. It was a SPECIAL day! I usually set them up about 4 times a year, once every 9 weeks.
Centers offer kids a chance to explore lots of musical objectives and are valuable and engaging learning tools.
Fairy tales are great tools for vocal, instrumental, and movement exploration for all students in the music classroom. From simple storytelling to a story with sound effects to a grand production, fairy tales are engaging and capture the imagination.
Start with the story, add body percussion, vocal sound effects, and then transfer to instruments. See the tables below as examples.
Originally published January 7, 2023 Latest Update April 2, 2026
Looking for the best parachute activities for elementary music? This big list guide covers everything from songs, games, and activities to exploring form, melodic direction, rhythm, beat, and vocal exploration.
These activities provide a fun application for music elements as well as physical activity for fitness, a brain break, and a social-emotional learning (SEL) outlet.
Table of Contents
This post may contain affiliate links. I make a small commission at no additional cost to you. Read my full disclosure.
You need to have several “tricks” to pull out of your back pocket when kids need to have a brain break, to expend some energy, to divert attention from something else going on in the room (a potential meltdown for ex.), to prepare them for a high-concentration activity, or when you the teacher need to have a mental break yourself.
And so, the Jumping Game was born!
Stand in a circle
Play a song with a good beat (see Spotify playlist below)
T stands on the outside of the circle and taps a child on the shoulder.
That child goes into the middle and begins to jump
Prepare kids for the jumping game by talking about how they can be creative by using feet together, feet apart, 1 and 2-foot jumping/hopping, use of arms, bending knees, turning as you jump, etc.
Everyone in the circle imitates the leader in the middle
T occasionally comments about some of the fine points of the jumper. “Ooh, did you see how they alternated bending their elbows as they jumped?”
Tap the next child in the circle after about 10 seconds, continuing to make your way around the circle.
In a class of 25, this gave the class about 4 minutes of jumping.
Learning how to use Blooket in elementary music is just understanding the basics of the game, assessment opportunities, safety reminders, SEL considerations, and using a list of games I’ve created.
Blooket was created to imitate video games that kids love. It is Kahoot with more game options and can be played solo and as a class.
Originally published July 8, 2022 Latest Update July 23, 2026
Here are some tried, true, and new beginning of the year elementary music activities with the perfect combination of Engagement with Expectations!
You’re a new teacher, new to elementary, or ready to freshen up your day and week-1 elementary music activities. You’re nervous about getting started on the right foot. You don’t want to do too much talking but make expectations clear. Here are the details for that perfect purposeful play!
Beginning of the Year Activities That Work
You want your beginning-of-the-year music activities to be that perfect combination of fun and learning while teaching routines and expectations. Here you’ll find some name games and activities that will have your students interacting on the very first day in music class.
Here’s a plan that worked for me year after year and is the perfect example of- “Variety is the spice of life.”
Elementary Music Lesson Plan for First Day of School
This lesson plan for the first day of school in K-8 elementary music was always a hit. It offers the big three: connection, routines & procedures, and a fun game activity!
CONNECT: A very short bio about yourself that lets kids make a connection. Share whatever you’re comfortable sharing but they love to hear about hobbies, music taste, pets, and family.
ROUTINES & PROCEDURES: Choose the routines and procedures that will be important for your teaching
NAME GAMES: Pick one or two name games (below) that interest you and add it to your lesson plans. Using someone’s name is personal and a great way to connect to each other.
SINGING GAME: End with a singing game! Check out singing games to immediately get kids singing and having fun.
If you love lesson plan ideas that infuse music with classroom management, join the Oodles Newsletter for weekly tips and trick just like the ones here!