If you struggle to teach and practice routines and procedures in elementary music or just need some NEW IDEAS, here are some actionable steps!
Let’s look at WHAT we need and then HOW to teach it!
This post may contain affiliate links. I make a small commission at no additional cost to you. Read my full disclosure.
The Importance of Routines and Procedures in Elementary Music
In Field of Dreams, the voice says, “Build it and they will come.” Just pretend you hear a voice that says, “Teach it or they will run the show.”
Consistent routines reduce behavior issues and enhance the learning environment. They establish an overall expectation for the room and the music-making activities. Instead of managing behaviors, you are reinforcing expectations and making music.
Established routines and procedures in elementary music provide structure, create a sense of security, and allow both teachers and students to focus on what really matters-making music.
How Do You Teach Routines and Procedures?
Here are some ways to teach routines and procedures in elementary music!
- Explain the procedure (what it is and why it’s needed)
- Model it-teacher and/or students can model it
- Practice as a class
- Review and practice after breaks, holidays, etc.
- Give positive reinforcement if you or the school has a system in place
- Get student input to make it better or create new ones where the students see a need
More Ways to Teach & Practice Routines & Procedures
If you’d like to try an additional incentive, students respond really well when you gamify the procedure. Here’s an example.
We Are the Champions Competition
Most kids know about the Olympics so use a We Are the Champions game. The teacher determines what constitutes a gold, silver, or bronze in a rubric, students practice the procedure, and the teacher awards the medal.
It forces you as the teacher to really think about the steps and parameters for a procedure and clearly relays that information to the students. Check out the rubrics below for G (gold), S (silver), and B (bronze).


Create this type of game in Google or I’ve made one for you. ↙️
GREAT IDEA!
Pull We Are the Champions out at different points in the year with “new” games where they have to (re)earn their medals. Instead of the Summer Olympics, how about the
- Fall/Winter/Spring Games
- Turkey Games/Heart Games/Shamrock Games
Because, yes, these procedures need to be refreshed from time-to-time all year long!
Make It a Routines & Procedures Bulletin Board

Highlight different routines and procedures in your music room!
Here is the “event” LINING UP!
Tools to Teach & Reinforce Routines & Procedures
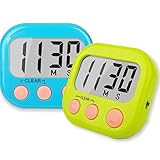
Timers
Timers give a sense of importance, expediency, and fun to practicing routines and procedures in elementary music. There are lots of online timers or ones you can imbed in digital presentations. Physical timers are fun too. This teacher favorite has bright colors, times up and down, and is a cheap buy.

Dry Erase Signage
Dry erase tape and sheets are great to use for non-permanent signage to help students know where to go and what to do. They can easily be changed as you see needs change.
What Are Key Routines and Procedures for the Elementary Music Classroom?
The most important procedures are for transitions, music-making, and general instruction.
Transitions in Elementary Music
Transitions are when you are getting ready for the next activity. Here are the key ones for music.
Entering
While a few teachers greet each student at the door, many have students go directly to assigned seats and an opening routine.
- Sing a welcome song
- A set activity on the screen
- Rhythm Practice
- Video (Musician of the week, genre specific, holiday/celebration specific)
- Movement (I created Body Shapes!)
Sometimes the routine is to not go to an assigned seat but perhaps movement related with stepping a beat or a circle activity.
Exiting
You need to decide how kids will exit your room. There are two choices. Line up in your room or dismiss by rows to the teacher in the hall.
Dismiss to the Hall: Sometimes teachers would stand at my door (too long) and I was ready to run to the bathroom, start my next class, or whatever. So I sometimes asked the teacher to wait down the hall a bit and I’d dismiss by rows. “Row 1, walking feet, here you go.”
Line up in the Room: Some teachers want kids in alpha order, room order, or random order. Just jot down which one and line them up that way. Think about where you want that long line to end. (not by your desk)
Sometimes I’d say, “Ms. H, I’ll let you line them up today.” And the classroom teacher would call them to the door. (I learned a lot watching teachers’ techniques good and bad. Most were amazingly fabulous and clever.)
Assigned Seats
More than once in my almost 40 years of teaching I said to myself, “Don’t EVER let them choose their own seats again. What were you thinking?”
I love seating charts where I choose the seats. There were times when I let them choose their own groups or partners but most of the time I did it. It prevents behavior problems and children feeling isolated because they don’t have a friend.
Find out all about assigned seating in a blog post in glorious detail with the added benefit of how many learning opportunities you can set up with a good plan.
Making Circles
I’ll die on the alpha circle hill! There’s no muss no fuss when you have alphabetical assigned seats for a circle. Yes, they get tired of standing by the same person all the time so a trick is to play a partner changing game such as “I Let Her Go Go” for a couple of verses, stop, and then voila, a new partner. It’s so fast, easy, and efficient.
Sitting Down
There were times where I needed to have an expectation for how to sit down. Using the “What I Said, What They Heard” idea…
What I said, “Great job everyone! Please quietly have a seat.”
What they heard, “That’s over! Let out a whoop, then sit down by first jumping up in the air to give gravity a little help, then fall down to your seat and make sure your foot comes within inches of the person’s head in front of you. GO!”
So I created an expectation that you needed to sit down with absolute NO sounds, at all. I’d have them sit and as they did it I’d count 1, 2, 3, 4, 5, etc. as I heard a word, a plop onto the floor, a grunt, etc. Ok, that number needs to be zero. Everybody up and let’s try again. Rinse and repeat until it got better. The NEXT time I’d say “sit with no sounds like we practiced.”
Quiet Signals
There are so many quiet signals but part of their success is if you’ve practiced them and then re-taught throughout the year when they start to become ineffective.
Here are a few to consider.
Call & Response
- T: Class. S: Yes
- T: If you can hear me, clap once. S: (clap one time)
- T: 1, 2, 3, eyes on me. S: 1, 2, eyes on you.
- T: Hocus Pocus S: Everybody focus.
Sound Signals
- Clapping rhythm (ta ta ti-ti ta). T claps and S echo.
- T speaks quieter and quieter so S need to be quiet to hear them.
- T stops teaching/talking and looks/waits for class to get quiet.
Visual Signals
- T raises hand. S get quiet and raise hand.
- Silent Countdown: T raises hand with finger countdown 5, 4, 3, 2, 1.
Instrument & Equipment Procedures
Teaching students how to use instruments and equipment, from getting them to playing them and to putting them away, takes lots of thought from the teacher based on your room layout, the grade level, and the special challenges you might have with certain classes.
Your routines and procedures should prioritize student and equipment safety, minimize downtime, and maximize learning time.
Considerations include:
🔹 How to get instruments and put them away
🔸 Use of quiet signals when playing instruments
🔹 Designating an instrument resting position when quiet is needed
🔸 How to take care of (and with) accessories (mallets, drumsticks, individual bars)
What do you do if a routine and procedure is not working?
🔹 Try something different, switch tactics, a different procedure
🔸 Get student input to solve the challenge
🔹 Teach the part/new learning with NO instrument in their hands so their entire focus is on you
Using Songs to Trigger a Routine in the Music Room
Routines that are set to songs work SO well because the song triggers the routine (if you’ve taught it well) with NO TEACHER TALK!
Why it’s genius?
- sets an automatic time limit because the song is short
- because it’s a song, no teacher TALK, a routine
- music is magical
#1 Moving to Personal Space Spots
I saw this from @musicwithmisso on TikTok! It’s to get younger students spread out into personal space places around the room.
To the tune, Frere Jacques
(teacher sings) Find your bubble, find your bubble, your personal space, your personal space.
(students sing) I have found my bubble, I have found my bubble, my personal space, my personal space.
#2 Lining Up (unknown source) See it here.
To the Addams Family tune
Show me a line (5x)
You’re feet are pointing forward,
You’re hands are to your side,
A smile is on your face,
That’s how we form a line.
#3 Cleaning Up
(I created this one to get kids to tidy their centers, preparing to move to the next one.)
To Mary Had a Little Lamb
Now it’s time to clean our space, clean our space, clean our space. Now it’s time to clean our space and stand up straight and tall.
What Do I Do If a Routine or Procedure Is Not Working?
Practice with a portion of the room. Try just half of the room at a time or a row or two at a time. Then add on until the entire class gets it.
Divide and Conquer!
“Let’s try half the room. Stand up. Quietly sit down. Wow, that was great. Other side. Stand up. Quietly sit down. Wow, impressive. So this is going to be SO amazing. Everybody stand up. Quietly sit down.”
Circle Seats: One year I could not get one of my kindergarten classes to remember their assigned circle seats. So instead of trying to get them to make a circle all at once, I started with the six who knew their spot. Then I had them call the kids who sat on their right and left. With that many in their spots, the others easily found their spots.
Moving Circles: The same is true for getting younger students in a circle formation to move the circle to the right or left. Instead of a large circle, I broke the class into 4 circles where we could practice keeping the circles from collapsing. Then I was able to combine two circle and finally back to a big circle.
Shout Out
Is there something that’s challenging you that I didn’t talk about?
What’s your favorite way to teach procedures?
Let me know in the comments below!
These are great! Do you have any tricks for handing out pencils, crayons, etc?
Such a great question! These are my procedures for passing out pencils, crayons, and basic supplies to students.
1. To pass out pencils to single students, I either walked around and dropped a pencil on the floor in front of each child. (we sat on the floor) If I had a student helper do this, I found that kids argued with them about the pencil they received. Or I called them by rows. “Row 1, walk up and get a pencil, paper, and clipboard.” Sometimes I’d tell the other rows that they could go up when they saw the last person in the previous row get all their materials. This gave them the power/responsibility/ownership to go somewhat from teacher-led to student-led.
2. I didn’t have enough crayons to provide a pack for every child so I used either partners or small group formations. Sitting in a circle or in rows, I’d walk around and drop a pack between two students and say, “You two. You two.” to indicate who was partners. If I let them choose partners, same idea. I let them choose partners/groups about 30% of the time.
3. For small groups, I kept 6 caddies that contained a bunch or crayons, pencils and if needed, I could tuck in scissors, glue, etc. I again, walked around the room where students were in a circle, rows formations, indicated who was in the group, and either I’d give out the caddies or I’d say to the groups, “I need one person in each group to stand up.” (that person came to get the caddie) For the ONE group that had two people arguing over who would stand, they’d see the others getting their supplies and that would get the head butting to end!
4. Lastly, I kept these items on 3 shelves of a cabinet and there were times when I let individual students go to the cabinet to get something special. The cabinet contained all arts/crafts items: pencils, erasers, colored pencils, crayons, sharpeners, scissors, paper (copy, construction), caddies, glue.